Preview Mode & Demo
Preview Mode turns your school into a fully-clickable, pre-populated demonstration without exposing any of your real data. When it is on, the public website and every app surface render from a shared, read-only demo database while still wearing your school's branding (logo, colours, name and tagline). It is the recommended way to show prospective parents, staff, or evaluators exactly what Stunov looks like before you have finished entering live data.
You manage it from System Settings → Preview Mode.
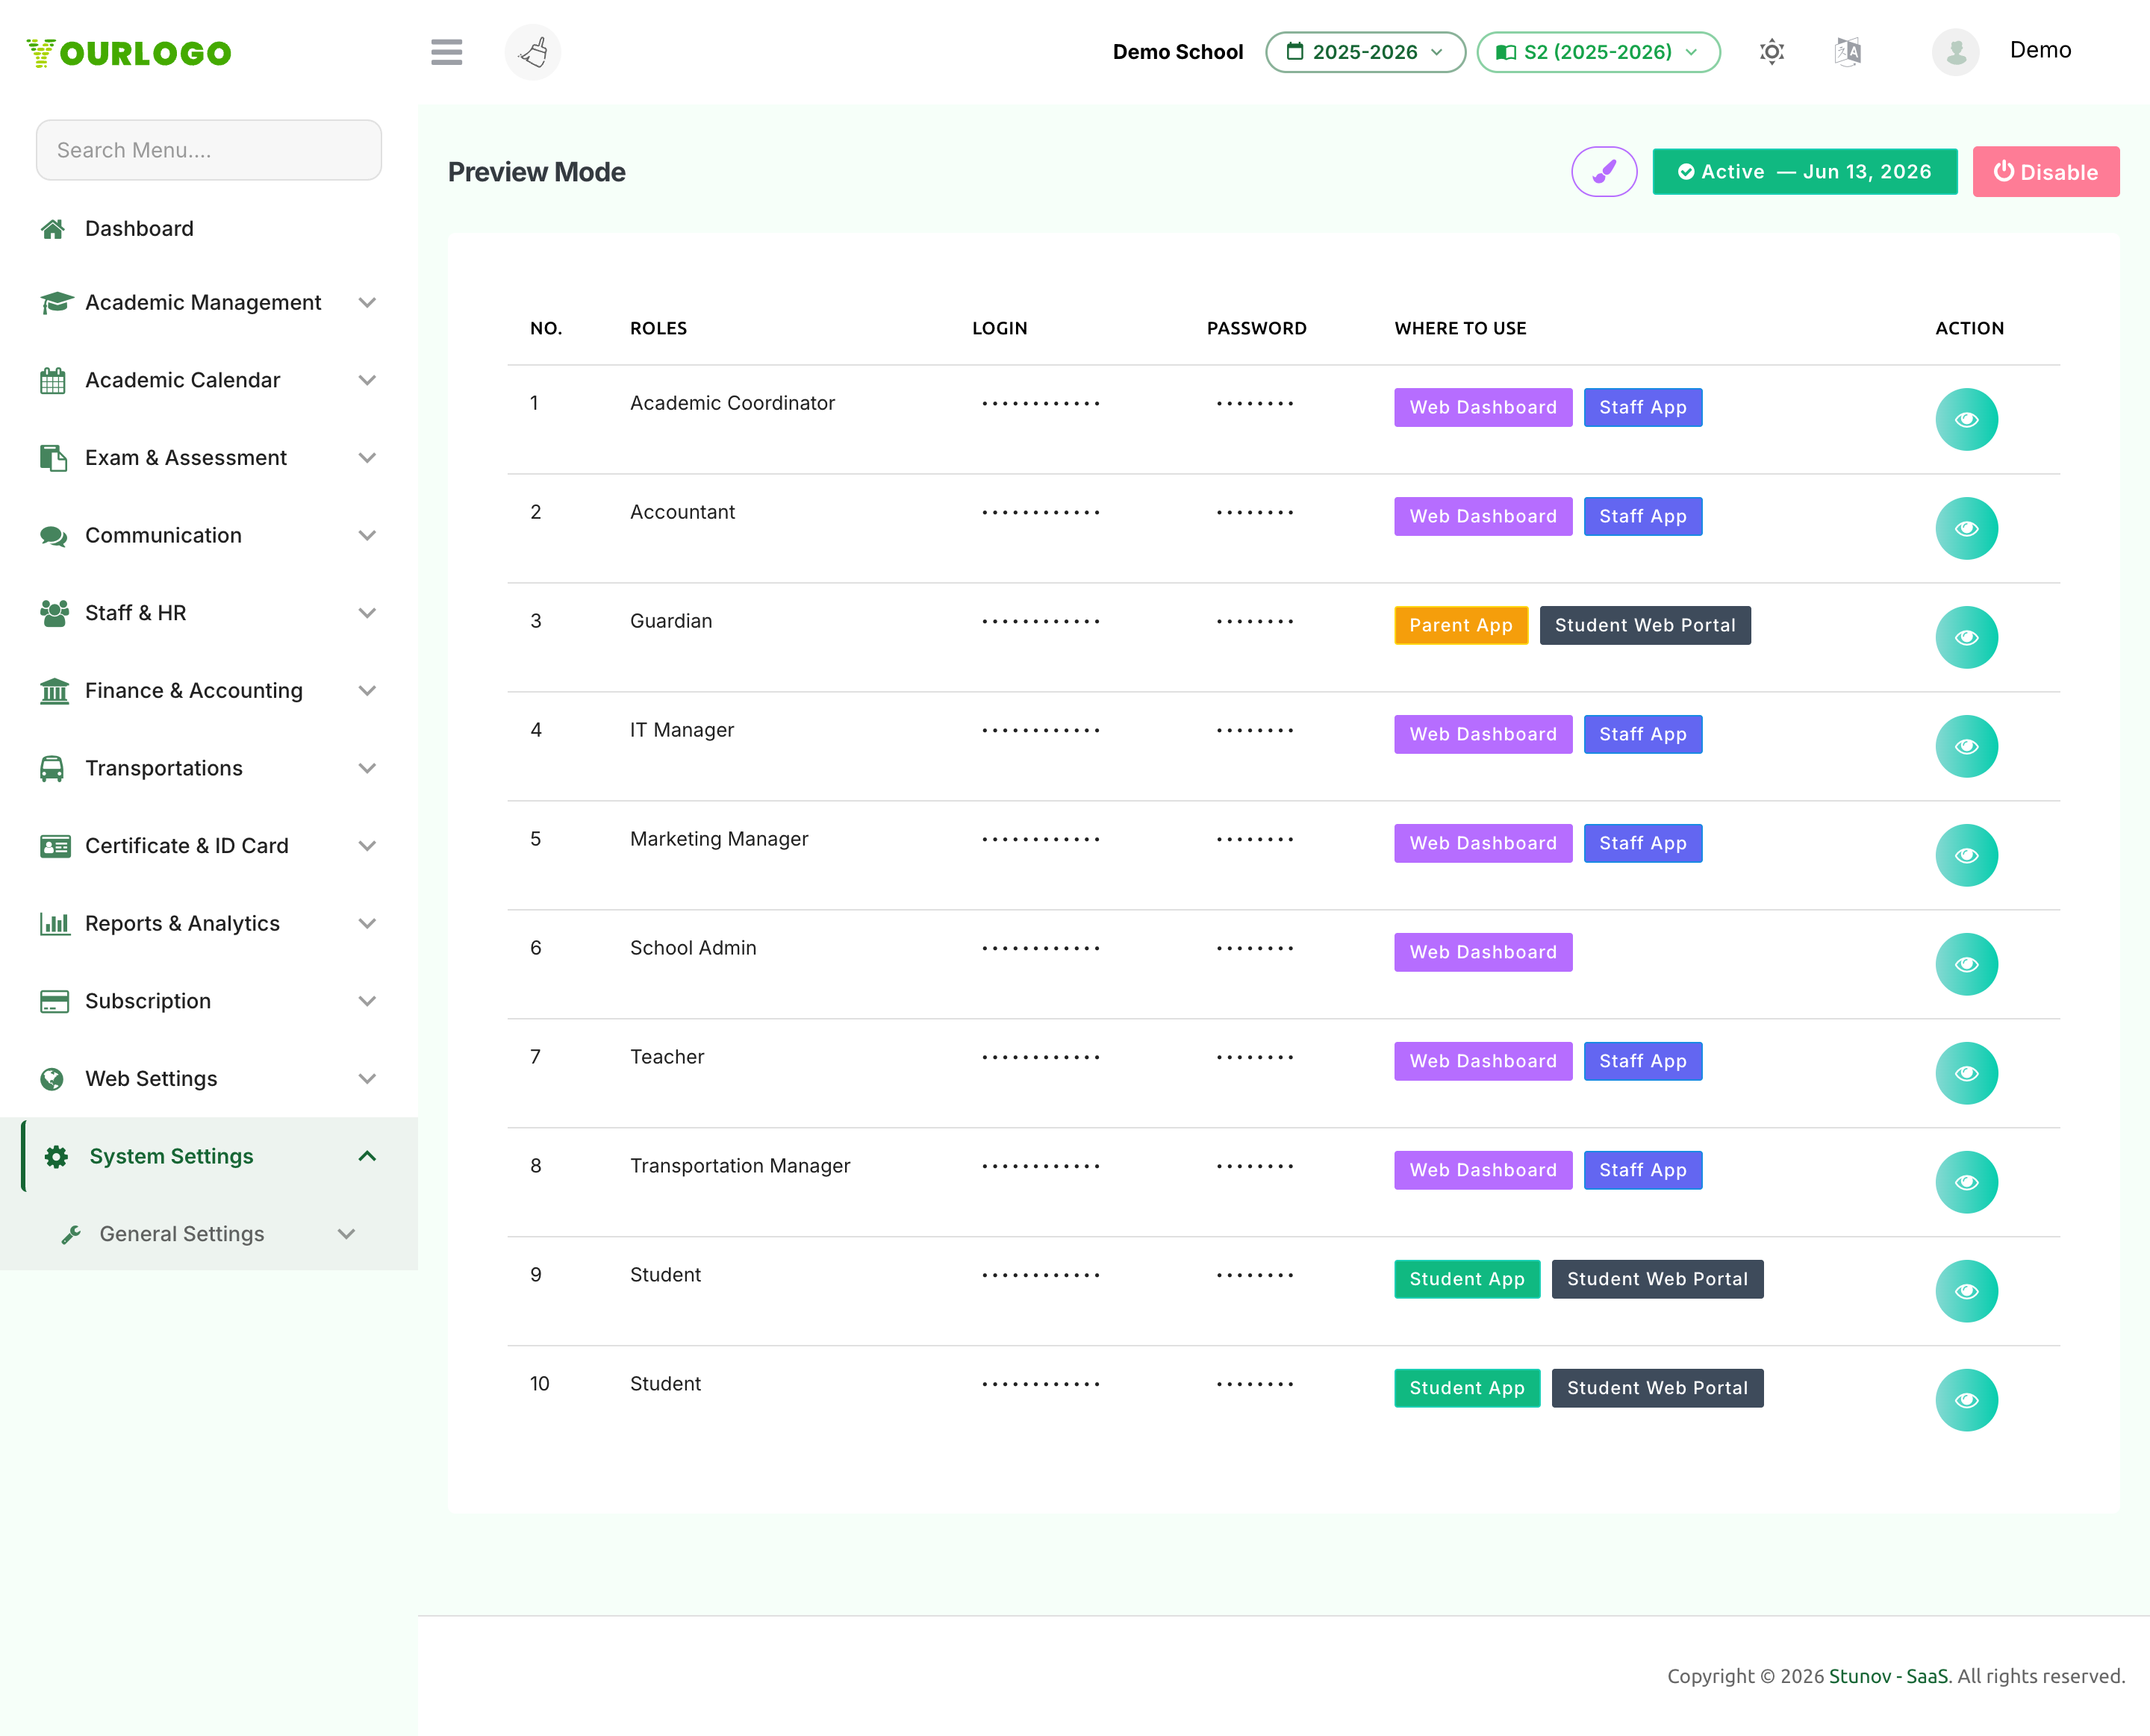
Preview Mode is controlled by users with the Manage School Settings permission (School Admin and IT Manager). Turning it on or off never touches your real tenant data — it only flips a flag and refreshes the demo snapshot.
What Preview Mode does
When Preview Mode is ON:
- Your public school website and the login experience render from the shared demo school (a fully-featured sample with classes, teachers, students, fees, exams and more).
- A demo account for every role becomes available so anyone can sign in and explore the web dashboard, Staff app, Parent app, Student app, and Student Web Portal.
- Your branding is mirrored over the demo data, so the demo still looks like your school.
- Everything is read-only: demo users can browse freely but cannot change data (with a few safe exceptions — see Read-only behaviour).
When Preview Mode is OFF, all surfaces return to your real tenant data and the demo accounts stop working.
Preview Mode is intended for short-lived demos. A school left in Preview Mode for more than the configured window (7 days by default) is automatically switched back to live data by a nightly maintenance task, so you never accidentally leave a real school showing demo data.
Demo credentials
While Preview Mode is active, the page lists a ready-to-use account for each role. The passwords are masked — click the View (eye) button on a row to reveal the exact password for that role.
| Field | Type | Required | Description |
|---|---|---|---|
| Academic Coordinator | Web + Staff App | Optional | Explore academic management, classes, and coordination tools |
| Accountant | Web + Staff App | Optional | Explore fees, payments, and finance screens |
| IT Manager | Web + Staff App | Optional | Full administrative access to settings and configuration |
| Marketing Manager | Web + Staff App | Optional | Explore website, communication, and marketing tools |
| School Admin | Web Dashboard | Optional | The primary administrator view of the whole dashboard |
| Teacher | Web + Staff App | Optional | Teacher day-to-day tools — attendance, assignments, exams |
| Transportation Manager | Web + Staff App | Optional | Routes, vehicles, and live bus tracking management |
| Guardian | Parent App + Portal | Optional | Multi-child parent experience and the Student Web Portal |
| Student | Student App + Portal | Optional | Student experience in the mobile app and Student Web Portal |
How the demo credentials are built
The demo accounts follow a fixed, predictable convention so they are easy to share:
- Logins for staff/parent roles use the reserved demo email domain
@preview.demo(for example[email protected],[email protected]). - Demo students use admission numbers that start with the reserved prefix
DEMO(for exampleDEMO0001). - Passwords for staff and parent roles follow the pattern
Preview@<code>, where<code>is a unique 6-digit number generated for your school the first time you enable Preview Mode. Reveal the exact value with the View button. - Demo students sign in with their date of birth (formatted
DDMMYYYY) as the password.
When Preview Mode is on, your school's login page shows a DEMO ACCESS section with a button for each role (Admin, Teacher, Academic Coordinator, Accountant, IT Manager, Marketing Manager, Transportation Manager, Driver, Helper). Clicking a button auto-fills the matching login and password — no typing required. This is the fastest way to give someone a tour.
Read-only behaviour
Preview Mode is a safe sandbox: demo users can look at everything but cannot persist changes. Any attempt to create, edit, or delete data is rejected with a "Preview mode is read-only" message. A small, deliberate whitelist of harmless actions is allowed so the demo still feels alive:
| Field | Type | Required | Description |
|---|---|---|---|
| Log out | Allowed | Optional | Demo users can always sign out |
| Send a message | Allowed | Optional | Chat/messaging works so the communication flow can be demonstrated |
| Submit an online-exam answer | Allowed | Optional | A student can attempt an online exam during the demo |
| Everything else (create / edit / delete) | Blocked | Optional | Blocked with a read-only notice — no real or demo data is changed |
Because the demo runs against a shared sample database, even the whitelisted actions above are not meant to be permanent. Do not use Preview Mode to capture real data — switch Preview Mode off and use your live tenant for anything you need to keep.
Branding mirror
So the demo still looks like your school, Stunov keeps a branding mirror — a snapshot of your logos, colours, name, tagline and contact details — and overlays it on the demo data at render time. You can review and adjust the mirrored branding directly from the Preview Mode page using the Edit Branding (pencil) button.
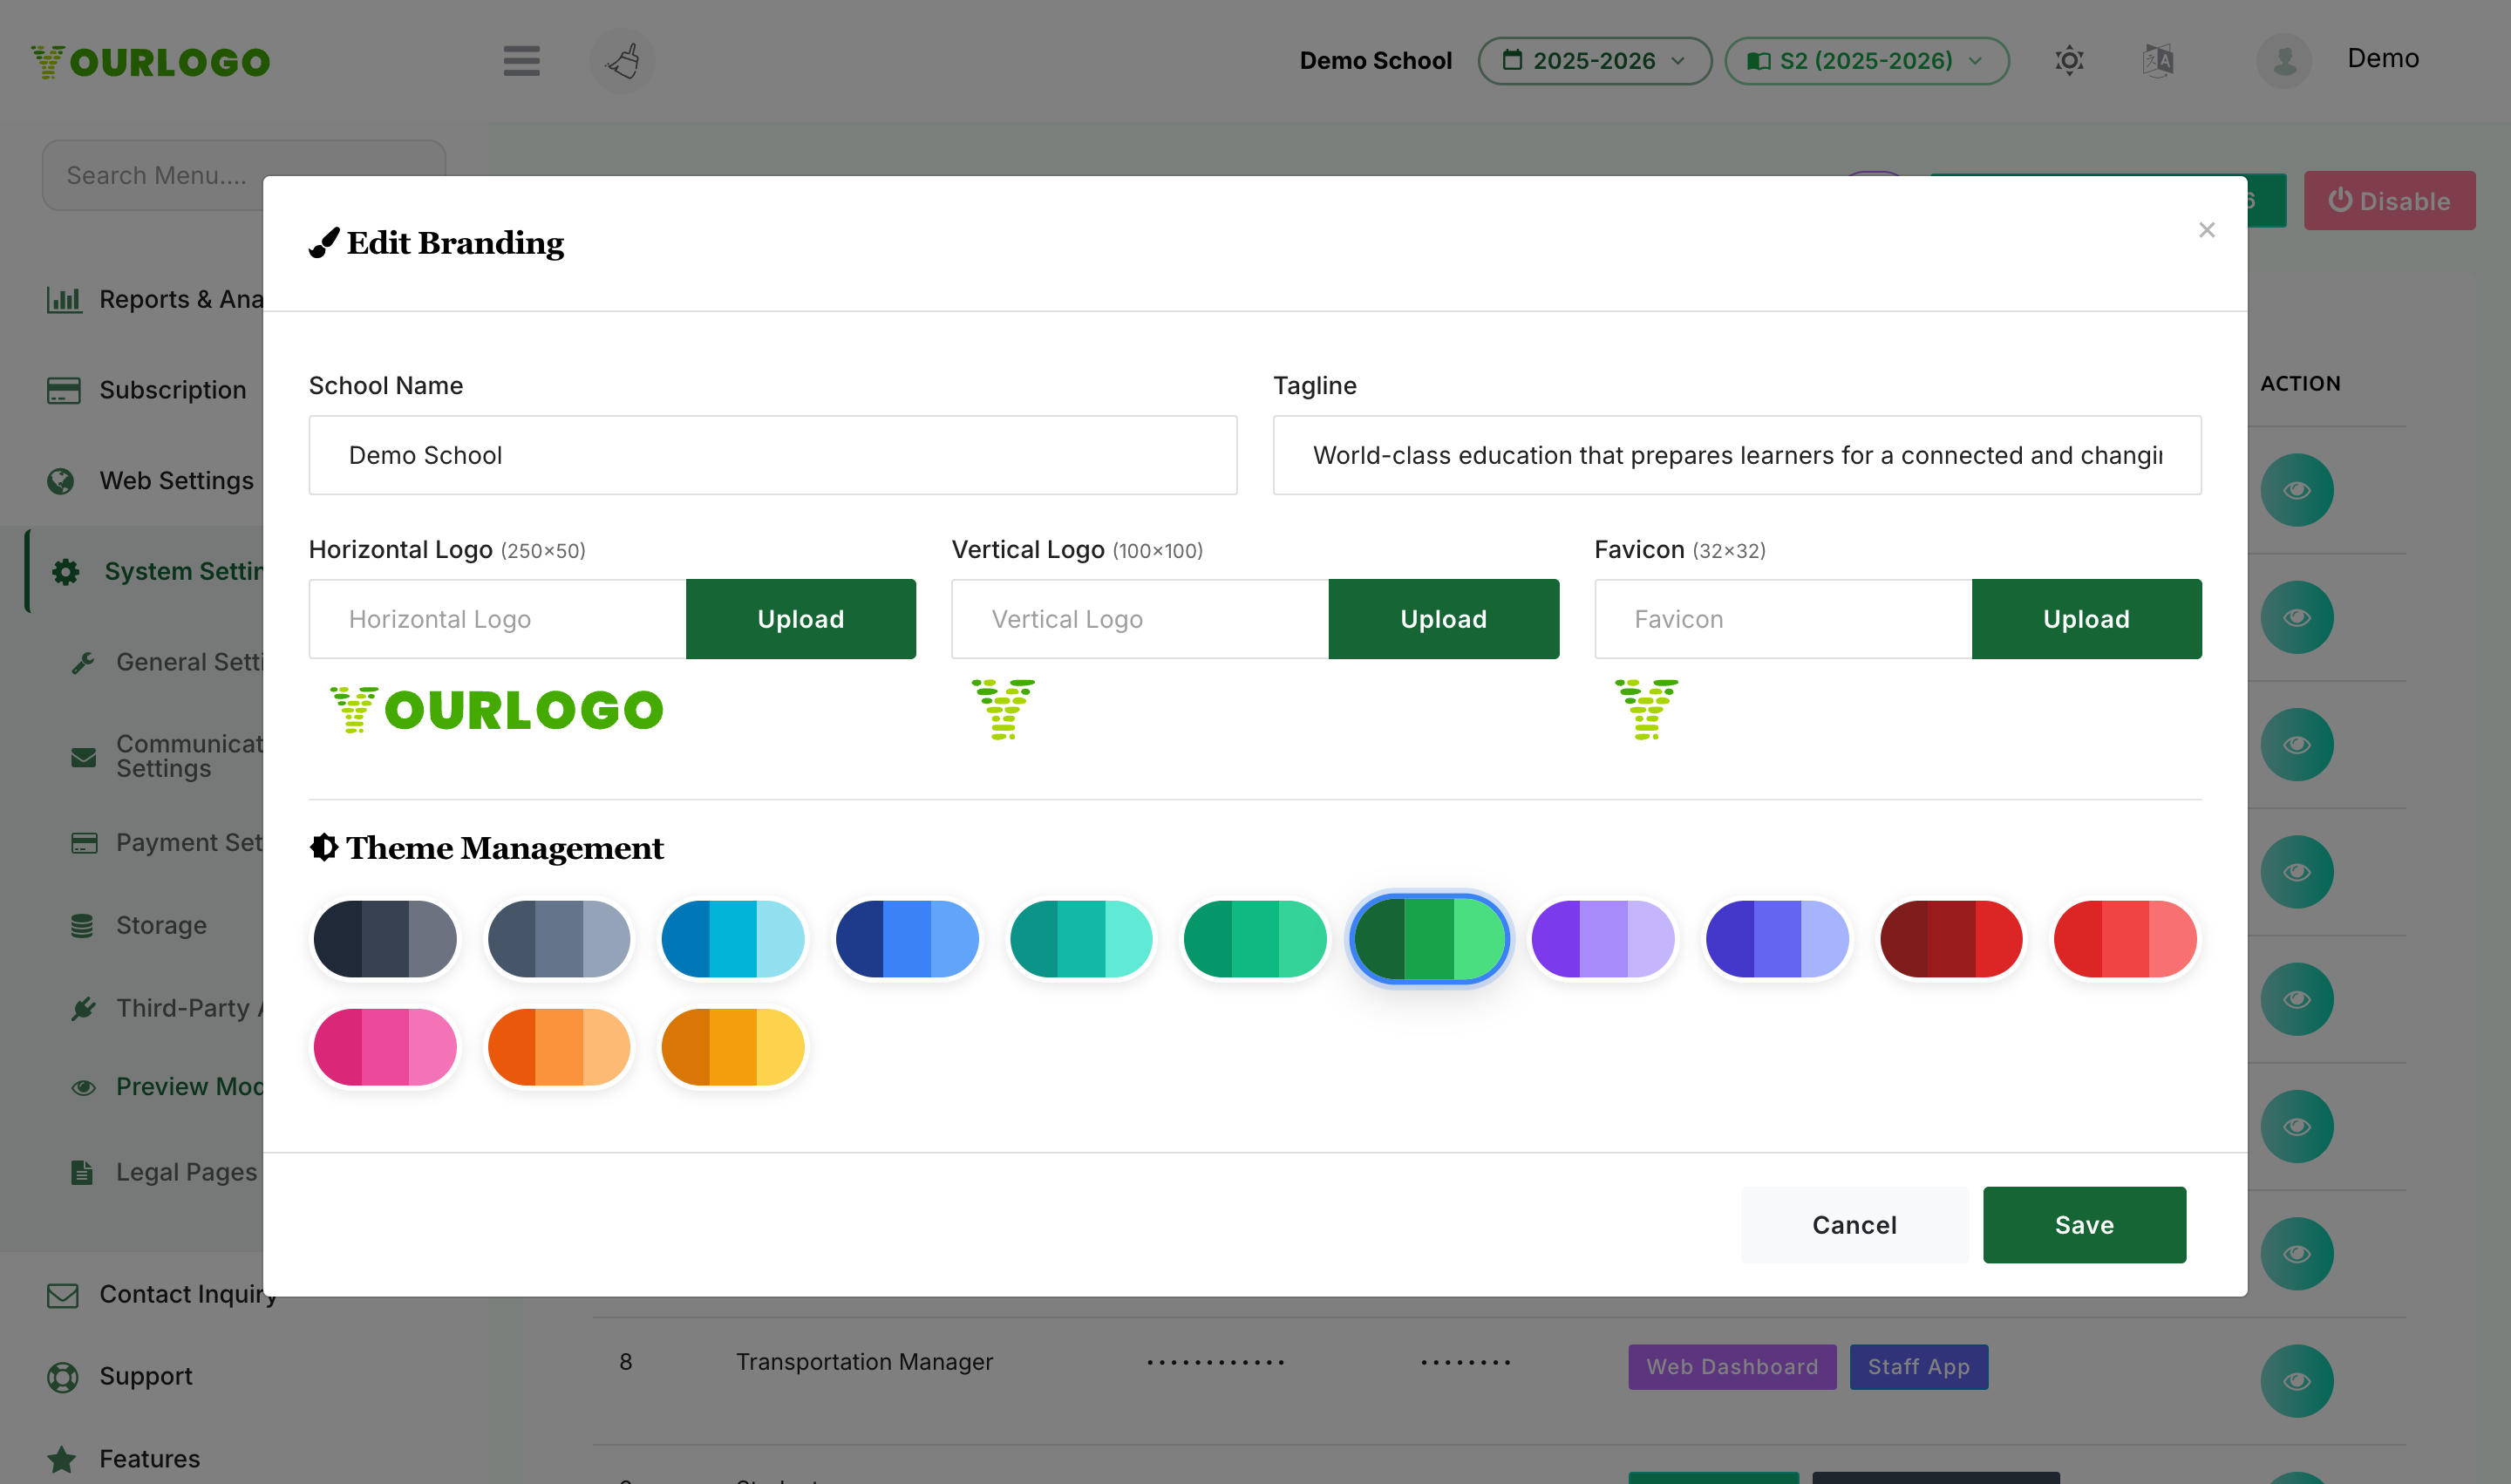
The mirror captures the values below. It is refreshed in two moments only: when you enable Preview Mode, and when you save branding changes while Preview Mode is on.
| Field | Type | Required | Description |
|---|---|---|---|
| School Name | Text | Optional | Name shown across the demo |
| Tagline | Text | Optional | Short marketing tagline |
| Horizontal Logo | Image (250×50) | Optional | Primary logo used in headers |
| Vertical Logo | Image (100×100) | Optional | Square/stacked logo variant |
| Favicon | Image (32×32) | Optional | Browser tab icon |
| Theme palette | Colour kit | Optional | Website and dashboard colour palette and fonts |
| Contact details | Text | Optional | School email, phone, address and dial code shown on the demo site |
Disabling Preview Mode does not delete your branding snapshot — it is kept so that re-enabling Preview Mode later is instant and looks identical.
Related Pages
- School Onboarding — first-run wizard for setting up a brand-new school
- Web Theme — manage the public website branding that the mirror snapshots