Custom Fields
Custom Fields let you add extra data fields to the Student Admission and Staff Registration forms beyond the standard built-in fields. This is useful for collecting school-specific information such as blood group, transport route preference, health conditions, or any other data your school needs.
- Custom fields appear automatically on the relevant admission/registration form once created
- Seven field types are supported: Text, Numeric, Dropdown, Radio Button, Checkbox, TextArea, and File Upload
- Fields can be marked as required or optional
- Display order is controlled via drag-and-drop reordering
System Settings → General Settings → Custom Fields
URL: /form-fields
Overview
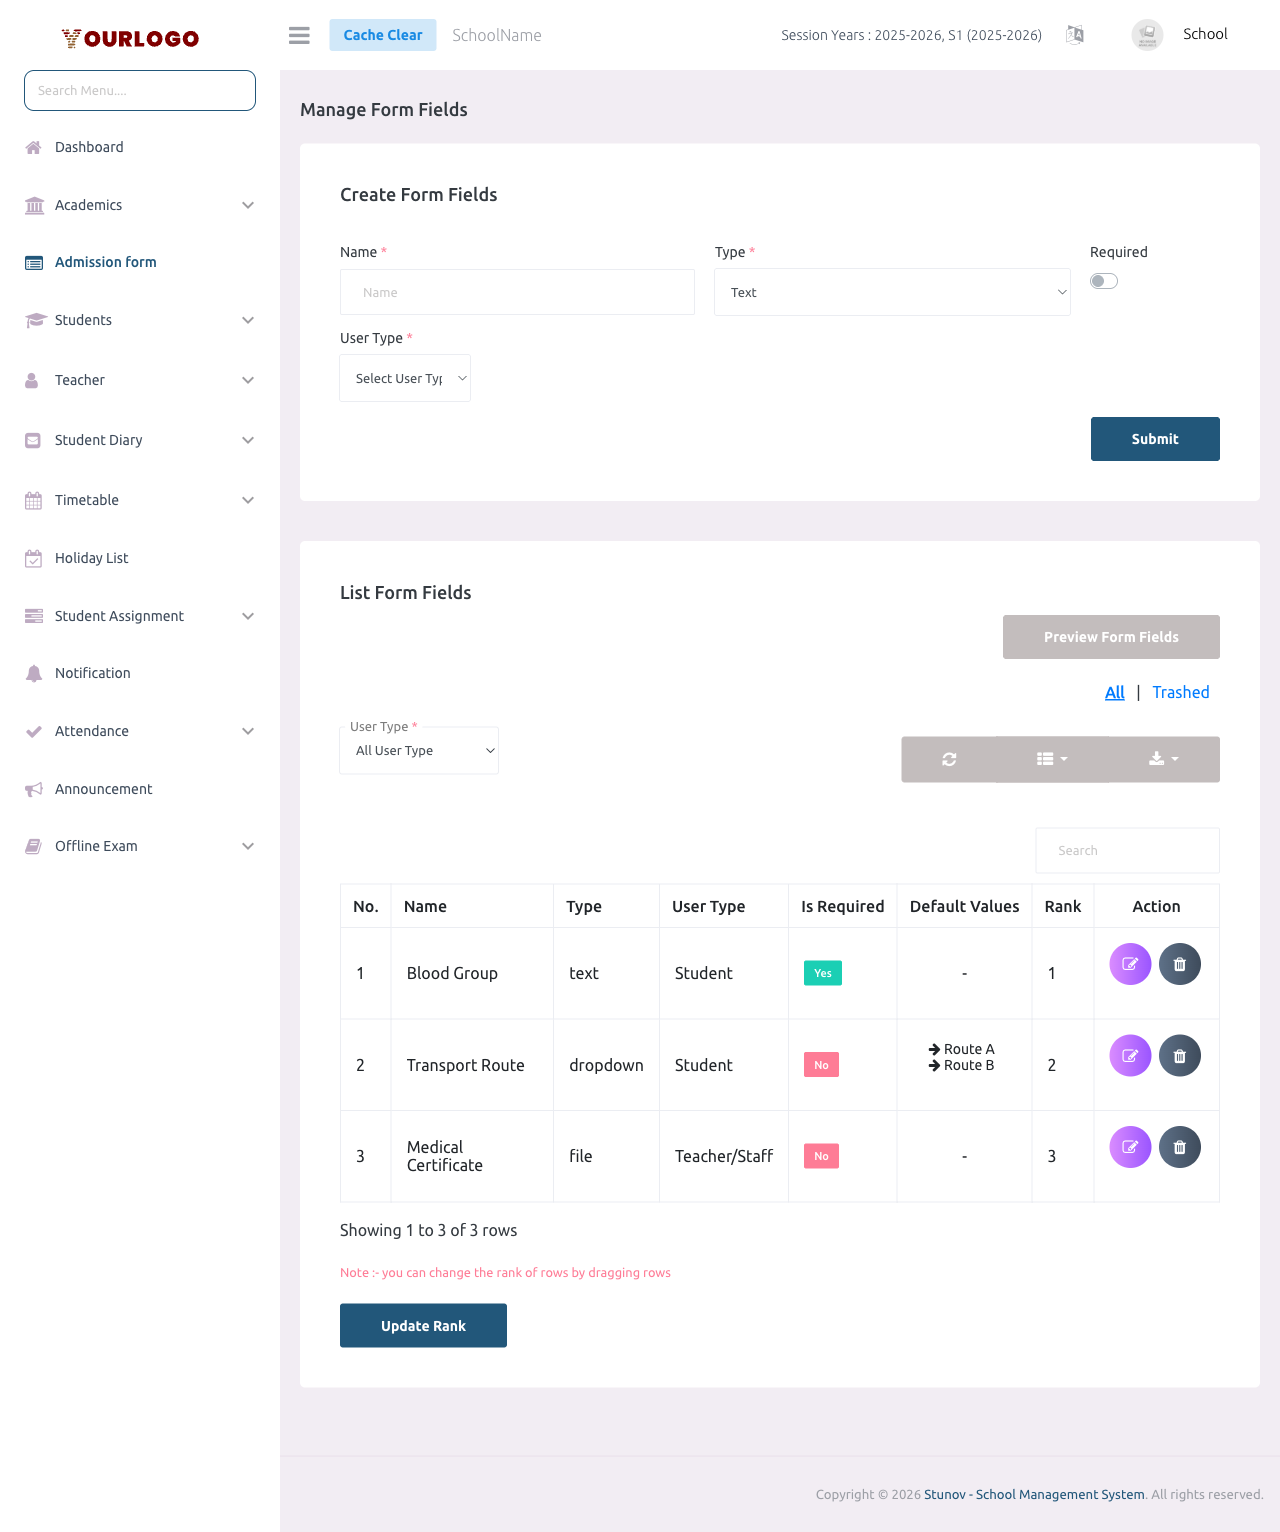
The Custom Fields page is divided into two sections:
- Create Form Fields — a form at the top to add new custom fields
- List Form Fields — a table below showing all existing custom fields with edit, delete, reorder, and preview capabilities
Create a Custom Field
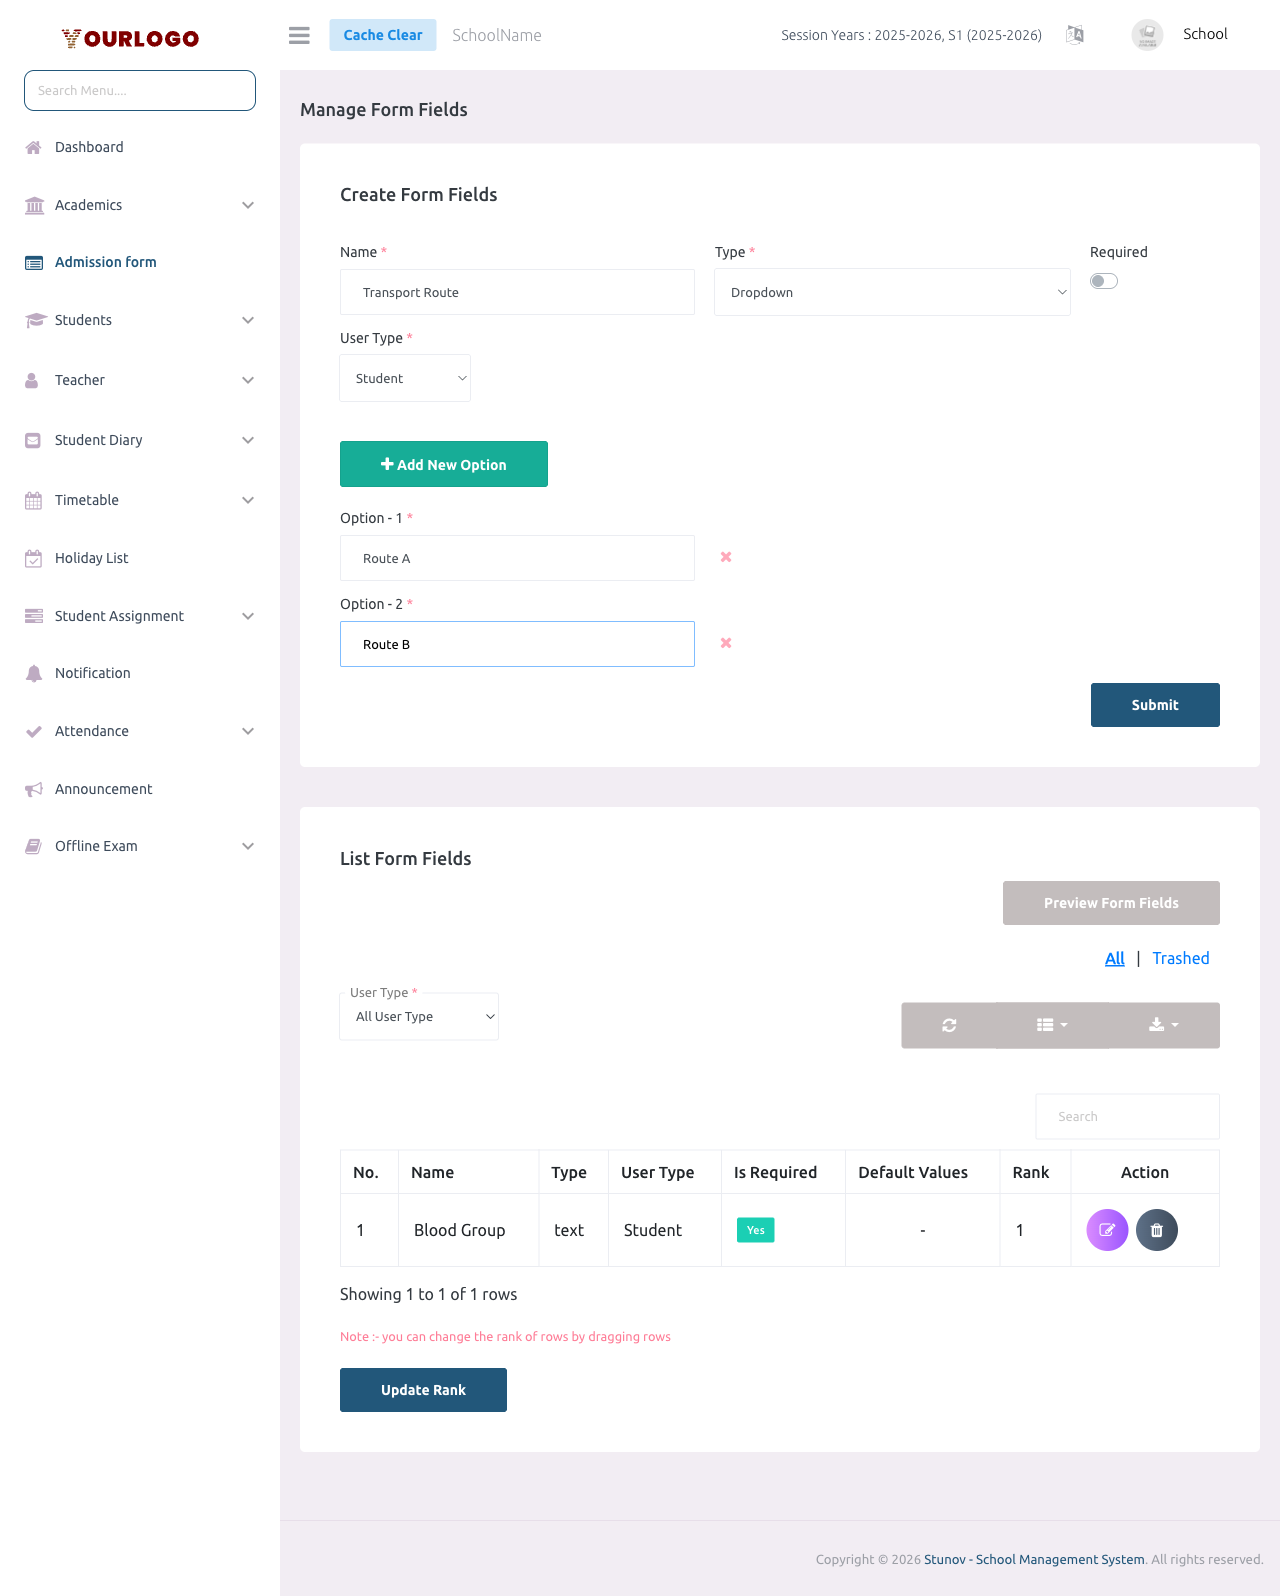
Create Form Fields
| Field | Type | Required | Description |
|---|---|---|---|
| Name | text | Required | The label that appears on the admission/registration form. Only letters and spaces are allowed. |
| Type | select | Required | The input type for this field. Options: Text, Numeric, Dropdown, Radio Button, Checkbox, TextArea, File Upload. |
| Required | toggle | Optional | When enabled, the field becomes mandatory on the admission/registration form. Default: off. |
| User Type | select | Required | Determines which form this field appears on. "Student" adds it to the student admission form. "Teacher/Staff" adds it to the staff registration form. |
| Options (conditional) | repeater | Required | Shown only when Type is Dropdown, Radio Button, or Checkbox. Add one or more text options. Click "Add New Option" to add rows, use the remove button to delete options. |
Supported Field Types
| Type | Input Rendered | Options Required | Use Case |
|---|---|---|---|
| Text | Single-line text input | No | Short text: blood group, nickname, emergency contact |
| Numeric | Number input (min 0) | No | Numeric data: number of siblings, distance from school |
| Dropdown | Select/combobox | Yes | Single choice from predefined list: transport route, religion |
| Radio Button | Radio button group | Yes | Single choice with all options visible: gender preference, meal plan |
| Checkbox | Checkbox group | Yes | Multiple choices allowed: extracurricular activities, allergies |
| TextArea | Multi-line text area | No | Longer text: health conditions, special notes, address details |
| File Upload | File picker | No | Document upload: medical certificate, ID copy, photo |
Choose Dropdown when you have many options (5+) to save space. Use Radio Button when there are few options (2–4) and you want them all visible at once.
List and Manage Custom Fields
The list table shows all custom fields with the following columns:
| Column | Description |
|---|---|
| No. | Row number |
| Name | Field label |
| Type | Field type (text, dropdown, checkbox, etc.) |
| User Type | Student or Teacher/Staff |
| Is Required | Yes or No |
| Default Values | Listed options for dropdown/radio/checkbox types; "-" for other types |
| Rank | Display order on the form |
| Action | Edit and Delete buttons |
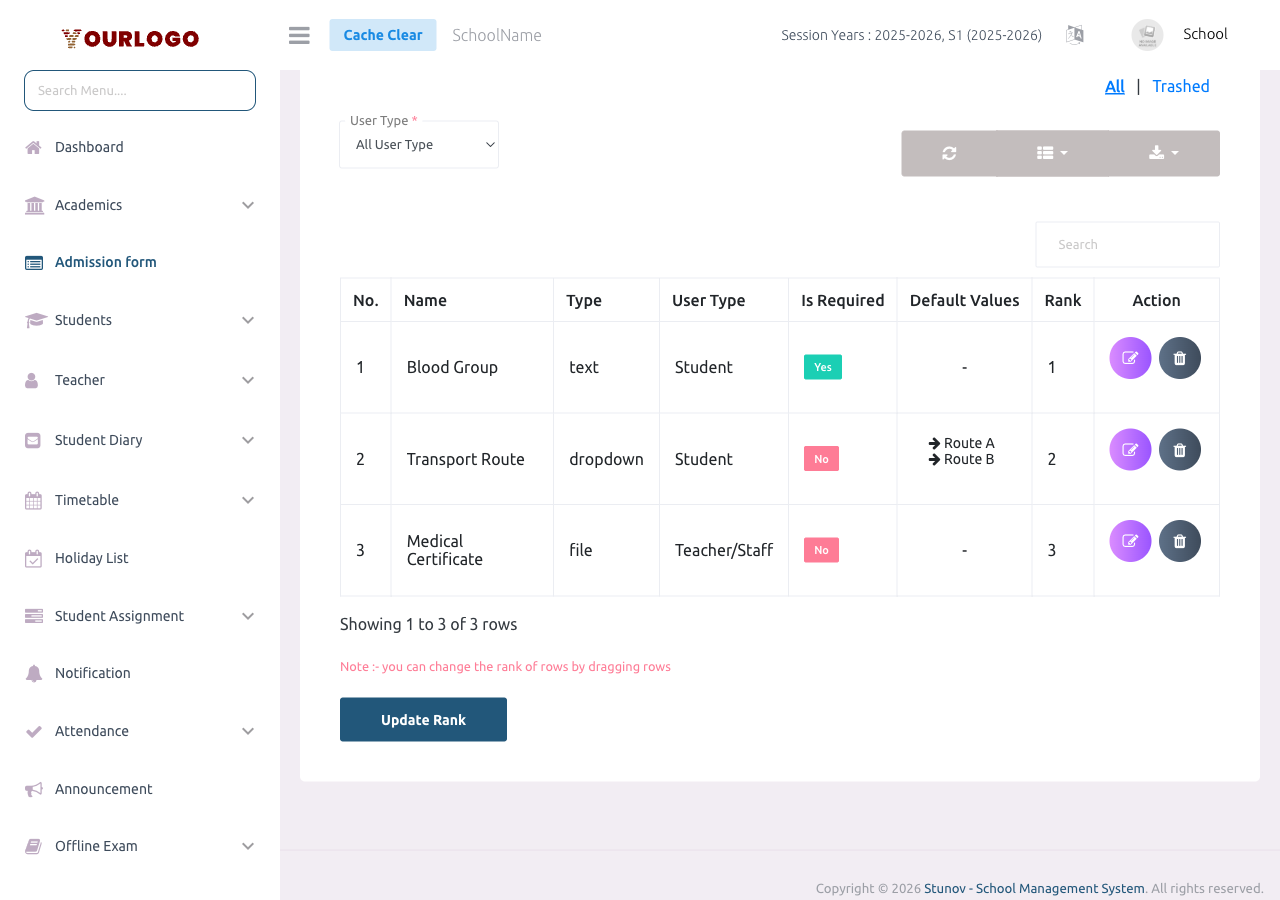
Filter by User Type
Use the User Type dropdown above the table to filter fields by target form:
- All User Type — shows all fields
- Student — shows only student admission fields
- Teacher/Staff — shows only staff registration fields
Search and Export
- Use the Search box to quickly find a field by name
- Click Export to download the field list as CSV or Excel
- Click Columns to show/hide specific columns
Edit a Custom Field
- Click the edit icon (pencil) in the Action column of the field you want to modify
- An edit modal appears with the current field details pre-filled
- Modify the Name, Required toggle, or Options (for dropdown/radio/checkbox types)
- Click Submit to save changes
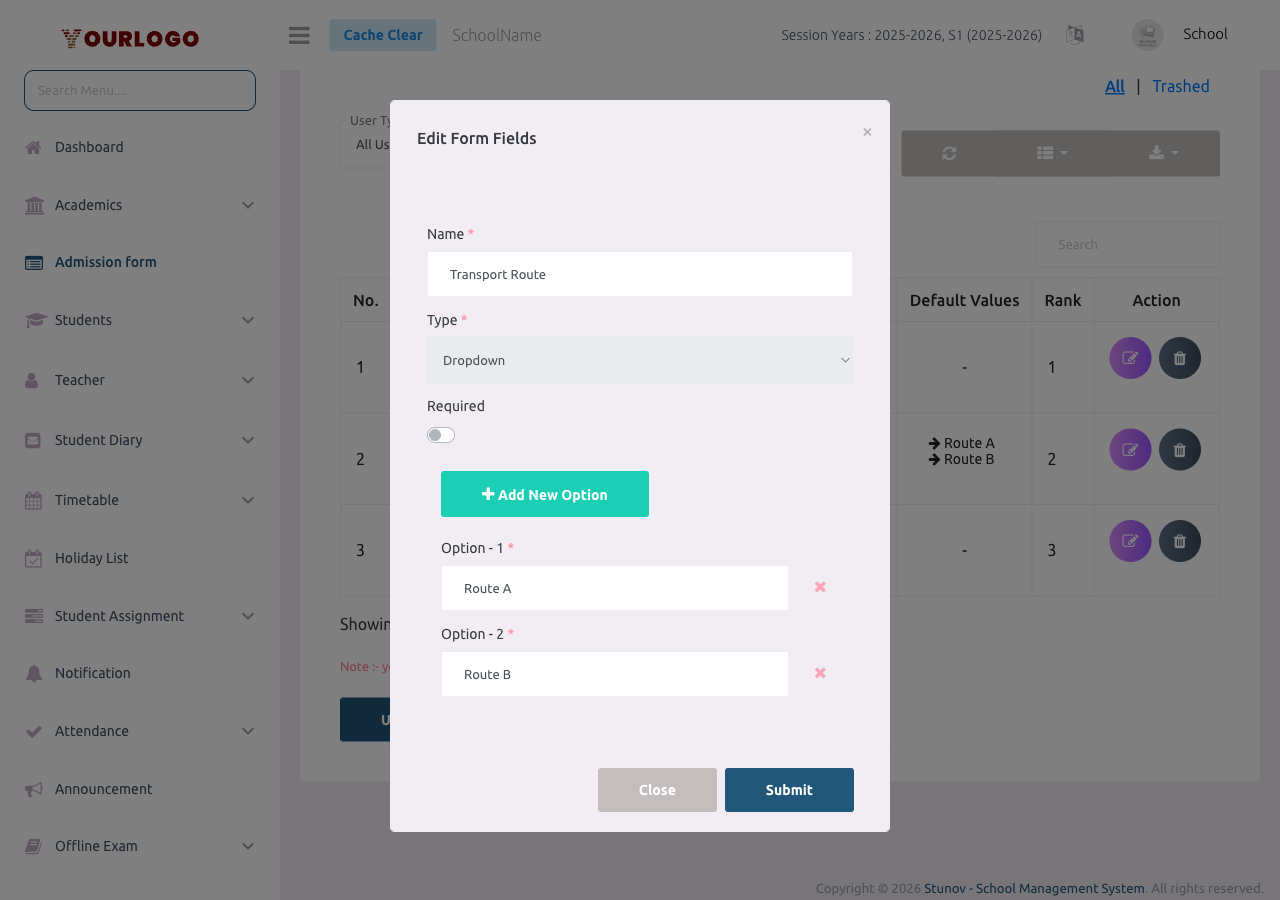
The Type field cannot be changed after creation. If you need a different type, delete the field and create a new one.
Delete a Custom Field
- Click the delete icon (trash) in the Action column
- Confirm the deletion in the dialog that appears
- The field is soft-deleted and moves to the Trashed view
Restore or Permanently Delete
- Click the Trashed link (next to "All") above the table to view soft-deleted fields
- Use the Restore button to bring a field back
- Use the Permanent Delete button to remove it forever
Permanently deleting a custom field also removes all associated data that was collected through that field from student/staff records. This action cannot be undone.
Reorder Fields (Drag and Drop)
The display order of custom fields on admission/registration forms is controlled by their Rank. To change the order:
- Drag a row in the list table to the desired position
- The rank numbers update automatically as you drag
- Click the Update Rank button at the bottom of the table to save the new order
The note below the table confirms: "you can change the rank of rows by dragging rows"
Preview Form Fields
Click the Preview Form Fields button above the list table to see a live preview of how all custom fields will appear on the admission form. The preview renders each field exactly as it would look to someone filling out the form.
How Custom Fields Appear on Forms
Once created, custom fields automatically appear on the relevant forms:
- Student fields → appear at the bottom of the Student Admission form (see Student Admission)
- Teacher/Staff fields → appear at the bottom of the Staff Registration form (see Staff Management)
The data entered in these fields is stored per user and can be viewed in the student/staff detail pages.
Permissions
| Action | Permission Key |
|---|---|
| View custom fields list | form-fields-list |
| Create a custom field | form-fields-create |
| Edit a custom field | form-fields-edit |
| Delete / Restore a custom field | form-fields-delete |
These permissions can be assigned to roles via Staff Management → Role & Permission.
Related Pages
- Student Admission — Where student custom fields appear on the admission form
- Staff Management — Where teacher/staff custom fields appear on the registration form
- Role & Permission — Manage who can create and edit custom fields